Build Your Qt Project on Windows and Mac OSX

Why i needed to build my app on another platform?

I’ve used Qt just for its cross platform-ness indeed its “code less and do more ” paradigm is apt  so there were hinderances in using MinGW compiler to build my project targeted to windows platform, below is the listed procedure and screenshots

Its a 2 Stage Process, Installing Libraries and building your project

Working on Microsoft Windows 7 and Mac OSX Snow Leopard

*Note: Phew Dont Worry its very simple, ive just added some information, so it looks little long

Procedure:

Prerequisites:

  1. mingw-get-inst
  2. Qt libraries 4.8.2 for Windows (or Higher Version)
  3. Your .proj file (Associated .ui, .cpp, .h etc)

STAGE 1: Setting up the environment

Step1:Download and install mingw-get-inst

Get if from here
You would need this as in Qt libraries installation it will ask you for the g++ component

Do select

  • C Compiler
  • C++ Compiler
  • MingW Developer Toolkit

Step2:Download and Install Qt libraries 4.8.2 for Windows

  1. Goto : http://qt.nokia.com/downloads
  2. Scroll down to Qt Library
  3. and choose your version

*Choose with minGW*

ex:Qt libraries 4.8.2 for Windows (minGW 4.4, 318 MB)

You Can get the above file from here

and finish the installation in case if it asks you for g++ component , point to the MinGW/bin folder you just installed in step1

Step4:Setting Up Environment Variables

In User variables create

Variable                 Value

QMAKESPEC          win32-g++

QTDIR                      C:\Qt\4.8.2

*The above value is the  location where you installed your version of Qt
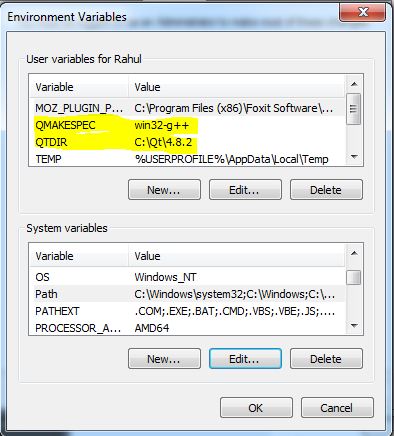
1UserVariable.jpg


Next: Set the Path Variable

add this

C:\MinGW\bin;C:\Qt\4.8.2\bin;
*They are locations where you installed MinGW and Qt respectively
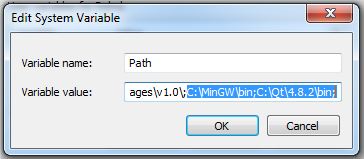
2Sysvariable.jpg


STAGE 2: Make and Build Project

Step1:Goto Start > All Programs > Qt by Nokia v4.8.2 (MinGW OpenSource)>Qt 4.8.2 Command Prompt
Now you can put your folder containing .proj file (Associated .ui, .cpp, .h etc) in one folder and placethem in C:\Qt\4.8.2
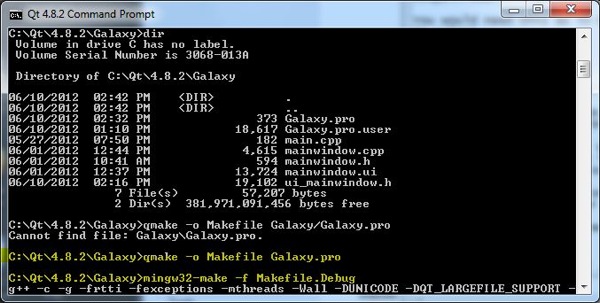
In the Screenshot the folder where my project files reside are in Galaxyand Galaxy.proj is the project file
Now go to the Galaxy Directory as cd Galaxy

Step2: Make

qmake -o Makefile Galaxy.pro

Step3: Build

mingw32-make -f Makefile.Debug
3MakenBuild.jpg


Now Within Galaxy Folder you have Debug and Release where your executable .exe file resides

Now Enjoy Making Projects on Mac OSX and Easily Deploy on Windows too

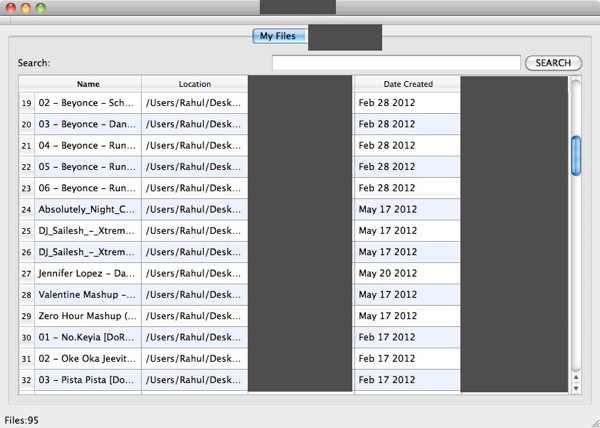
Here are the screenshots for my prototype apllication in windows and OSX

*Censored as it is a Coveted Project 😀 *

Deployed on  Mac OSX (Project Written and Built Initially):
5MacScreenShot.jpg


Deployed To Windows:

4WinScreenshot.jpg

Zip in Terminal (Mac/Linux)

Need to Zip Contents Using Terminal?

Why?

1.Because Your are working remotely?

2.May be your Connected to a machine Via SSH or alternative for it

3.You have access to Terminal Only

4.Duh! Just Wanna Know

Here are the steps:

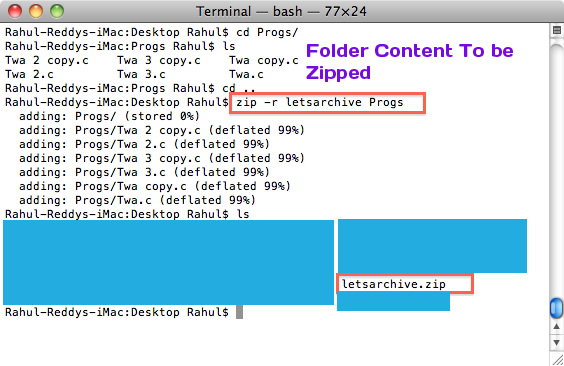
1.Go to the Directory Which has the folder to be zipped (here Directory is Rahul and it has folder called Progs that has to be zipped

2.Use zip -r A B

Where A is the name of the eventually zipped file

B is the Folder to be Zipped

-r is Recursively descent the contents and apply zip (needed)

Screenshot:

Terminal Zip.png


Remote Desktop Connect To Windows From Mac

This article presents a straightforward solution to access your windows Content on Your Macintosh PC!!!

So I (This means you-who is reading this article) may have one or more of the below questions in mind: 😀

  1. I some how want to access my remote Windows machine (windows xp,vista,7,8) on my MAC
  2. I have a huge 27′ Apple BOOTCAMP just to run few programs of windows on mac .
  3. Uh!!! I don’t want to fight with my MAC anymore!!
  4. Continue reading

Install OpenSSH on Ubuntu

Want Some Way to access your Linux machine , then you definitely need to install OpenSSH

It:

1.Allows you to execute terminal commands from almost any device (Yes Any device)

2.Copy Files to and Fro!

3.Execute your School/Programs directly on your machine rather than your College 😛

(may be your college systems are Hogging or its just that you got a pretty damn fast system)

4.Forget about using the insecure telnet service!, OpenSSh is Secure!!!

Setting Up:

Step1: Install the Server and Client relevant to OpenSSh , Execute the below Command in your terminal

 sudo apt-get install openssh-client openssh-server


Step2: Now You need to get your IP Address 
(if you know skip this) also assume you know the 
username of the system using which you log in :D

 ifconfig 

Note: look for the ip address after "inet addr" 
example 123.123.1.1 and username is rahul

Step3: Now download a client (putty/Terminal) to access your system
 ssh host@ipaddress

example : ssh rahul@123.123.1.1
Note: rahul will be the username of the Target system
in which the OpenSSh server is running and its 
corresponding ip address.

Make sure you enter logout in the terminal
 before you close your session
Happy Playing!